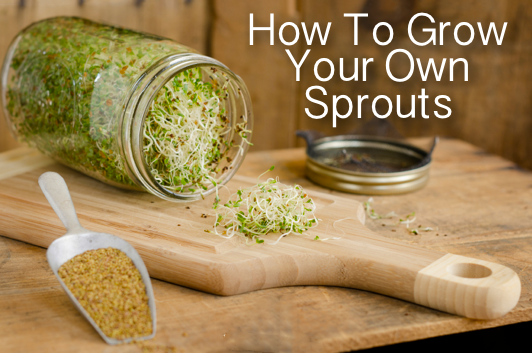
Can any greens taste more crisp and fresh than right after you harvested it?
To me it even tastes better, just knowing that it has been planted, nurtured, grown and ripened under our watch. I would like to teach you how you can create that fresh, crisp and tasty feel by harvesting sprouts that you have grown yourself at any time of the year.
Growing sprouts is a wonderful way to introduce children to the wonders of growing things.
Sprouts are relatively inexpensive to grow yet have extensive nutritional benefits. Growing sprouts is actually a pretty simple process. The sprouting process has to happen in nature without the help of human hands, so it is pretty intuitive overall. Choose your sprouting seed of choice, which could be alfalfa seed, broccoli seed, sunflower seeds, chickpeas, whatever you like.
Different Types of Sprouts
The sprouts, or young seedlings, of the Alfalfa plant are associated with several potential health benefits. Although adult alfalfa plants are too coarse and bitter to eat, alfalfa sprouts are tender and appropriate for use in salads, sandwiches and soups.
Broccoli sprouts are amazing too! They contain a compound called I-3-C which has been studied for its incredible ability to protect the body from cancer.
They are incredible in detoxifying and full of Vitamins A, B, C, E, K, as well as minerals: calcium, iron, magnesium, potassium and zinc. Broccoli sprouts are also high in chlorophyll which helps oxygenate our red blood cells so you can continue to feel amazing!
Sprouting Instructions
There are 2 main techniques to grow your own sprouts:
1. Using glass Mason jars
2. Using a glass container and paper towel
We are going to use the second technique
1. Using glass Mason jars
2. Using a glass container and paper towel
We are going to use the second technique
This is what you are going to need
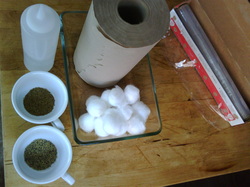
1. A one inch deep plate or container.
2. Unbleached paper towels, look for brown ones or ones that are friendly to environment.
3. Unbleached cotton balls.
4. Seeds. I’m using Broccoli Seeds.
5. Water in a spray bottle or squeeze bottle.
6. Plastic wrap.
7. A light window spot, preferable not direct sun.
2. Unbleached paper towels, look for brown ones or ones that are friendly to environment.
3. Unbleached cotton balls.
4. Seeds. I’m using Broccoli Seeds.
5. Water in a spray bottle or squeeze bottle.
6. Plastic wrap.
7. A light window spot, preferable not direct sun.
Directions
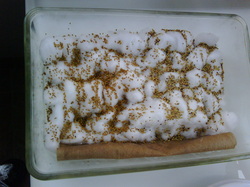
a. Put paper towel in the bottom of your bowl and spread cotton wool/balls evenly over, while keeping it light and fluffy.
b. Sprinkle your seeds evenly over cotton surface.
c. Spray water over seeds, enough to moist cotton properly but not soaking it.
d. Cover with plastic wrap and punch a few small holes in plastic wrap with a fork or toothpick
e. Place your bowl close to a window for proper light.
f. Keep cotton moist all the time, but do not soak heavy or let the seeds sit in water because that can drown them or grow mold.
Now you just need patience and wait for your seeds to sprout :)
5-7 days later :
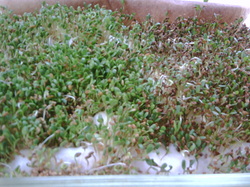
Your seeds should be sprouting in less than a week; don't forget to check the cotton each day to see so it stays moist. Change plastic wrap if needed.
Harvesting
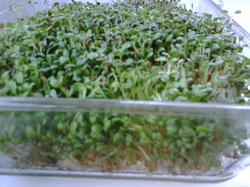
When one week has passed many sprouts are already tasty and crisp to snack on. I prefer to wait 10 days or more to harvest, until the sprouts have grown high enough to be cut with a scissor and for it to become a bit more volume to enjoy.
Letting your sprouts green-up
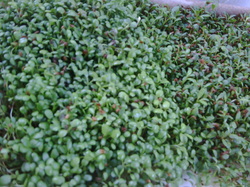
The colour of your sprouts will depend on their access to light. Greener sprouts mean they have more chlorophyll content. Your sprouts are ready for harvesting! Cut the required amount of sprouts and rinse under clean water to remove the hulls (seed casings).
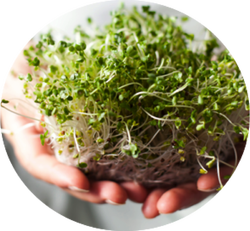
Harvest & Enjoy!
Harvest & Enjoy!
Happy Sprouting!!!
For a great video on sprouting using the Mason jar method– check out the video below :
